I'm trying to build a Kylo saber

Hi all,
wow, I’m loving the simplicity of the Propboard!!!
I’m used to over engineered DMX boards…the Propboard is also more cost effective than the £250 boards I was using previously!!

Quick question…

I’m trying to build a Kylo saber, main blade, and side emitters no sound required.

I’m just wondering how I would go about doing this?

I’m intending to use a single button, a 3700Mah battery, a neopixel main blade, and neopixel’s in the side emitters, and of course…a Artekit Propboard!!

Any help with the above would be gratefully received.

All the very best

Dave

PS: I’m a film industry prop maker, I’m a very capable maker, but only have a basic knowledge of electronics.

Hello @HandmadeProps,

Thanks for the kind words.

What you are looking for is totally doable and the electronics required are easy to connect.

We have a complete solution for lightsabers on the PropBoard, but right now it doesn’t support Kylo-style blades.

Electronics

I don’t know if you already looked into the PropBoard manual. For the battery I understand it is a single cell 3.7V battery. You can learn how to set the board for 3.7V in the Changing the power supply range section. And here on how to connect the battery.

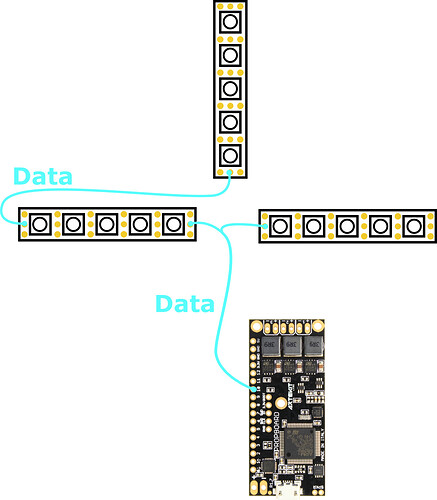
For connecting the neopixels you can read this section of the PBSaber manual (ignore the rest, just go for the LEDs connection). And for the quillions and main blade you should connect the data line like this:

The button connection is easy: you can connect it between any of the 0-12 available pins and GND (except pin 10, that’s used for the blade).

Of course, I recommend to include audio for a complete experience. You need a speaker and some audio files. The rest comes “free”.

Software

For the software you need to install some tools. I don’t know about your programming skills, but you can use our simple lightsaber demo as the starting base, and add support for the neopixels (I can give a hand with that; I should have some code for a Kylo-style blade somewhere, including “fire” effect).

By the way, check this video about some friends that used the PropBoard to create a Kylo saber!

PS: I’ll delete the other post as we can use this one here.

Hi Ivan,

Wow!!! now that’s what I call customer support!!!

Thank you so much for the prompt reply, and info!!!

If could give me a hand with the code, I would be extremely grateful!!

BTW, if you need any help creating props to demonstrate the different ways the Propboard can be utilized, please feel free to contact me!

Look forward to hearing from you, re: code.

BTW, loved the Kylo build video! looks amazing!!!

Very best wishes

Dave

Hi Ivan,

A couple of questions:-

Do you by any chance have a wiring diagram for the following configuration:-

1: Main blade - 248 neopixels (2 x strips back to back)
2: Side blades - 52 neopixels (2 x strips back to back)
3: Battery - Keeppower 18650 3000mAh single cell
4: Switch - momentary RS 133-6502 (can this be used to turn the saber ‘on’ and ‘off’ ?
5: Board - running Atrekit Propboard 1.0.2

I’m going to be using 3 way connectors , and JST’s to allow me to easily disassemble the electronics.

As far as the power side of things goes…am I correct in saying that I can connect all + to one cable, and connect it to the 3.3v on the Propboard, and the same with the -…group all - wires, and connect them via a single cable to one of the grounds?

Also, will the fact that I have strips back to back effect the way I connect the data cables together?
I’m sure I’ll get to grips with the software/hardware side of things eventually, but in the meantime, did you happen to find the code you mentioned in your previous post?
I’ve got to get the saber finished in the next couple of days, so any help you can give would be greatly received!!

Look forward to hearing from you.

Very best wishes

Dave

Hi @HandmadeProps

We don’t have that specific diagram, other than what you can find in the manual (or links from my first post), but if you post one, I can check it.

Yes. It will work with the example code, but since you will be rolling your own code, you can also use any other button/method you want.

The 3.3V pin of the PropBoard is just to power low-power peripherals, like a sensor. It can’t be used to power neopixels. From the manual (extra pins section):

The 3.3V pin outputs 3.3V from the internal LDO regulator. This regulator gives power the Cortex M4, microSD, accelerometer (and the audio amplifier in 3.7V-5V configuration). You can use it to supply power to external peripherals, or to connect the positive contact of, for example, a push button, but do not drain more than 80mA from it.

As a general tip, connect all the positive wires together to the positive of the battery. Do the same with all the ground wires (but connect them to the negative of the battery).

I didn’t understand the question. “Back to back” means that these are two separated 144 LEDs strips? In this case, the data cable is connected to both strips in parallel.

I’ve found the code. It’s class that handles a Kylo blade. I can post it later today. It has to be integrated into the example code I mentioned earlier.

Good afternoon Ivan,

Many thanks indeed for your response.
I’ll draw up how I imagine the connections.

Great news about the code by the way!!

Many thanks again!!

Very best wishes

Dave

Hi Ivan,

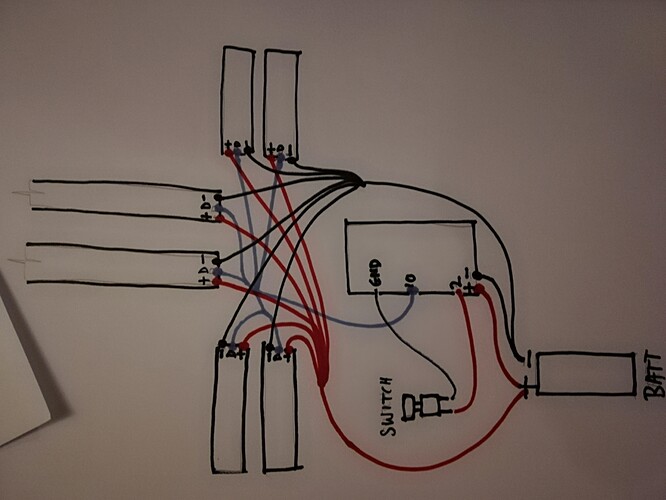
Here’s a very rough sketch of how I see the connections…

Very best wishes

Dave

Hi @HandmadeProps,

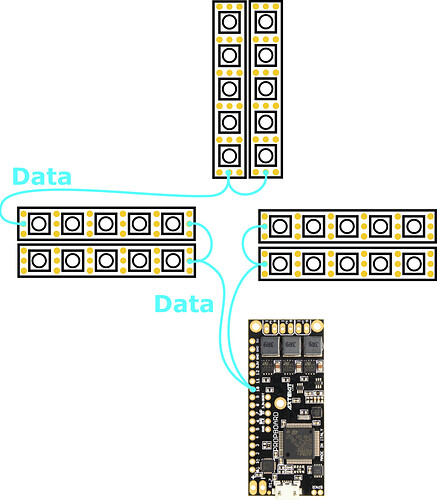
It’s OK, but pixels data line should be connected as the following image:

Also, for the button it’s better to use Pin 1 (or any pin with a YES in the IRQ column from this table) in order to be able to wake up from deep sleep with the on/off button (you can ignore deep sleep if you want).

Consider using a “kill switch” to disconnect the LEDs from the battery, because even if they are off, they still will drain (some) power from the battery.

Also, try to put a a 300 to 500 Ohms resistor between the LEDs data line and the PropBoard pin 10.

It is advised to put a 300 to 500 Ohms resistor between the data line and the PropBoard pad. This is to avoid damaging the microcontroller pin or the first LED in the LED strip in the case the data line is connected before VCC and ground.

Code is attached. I didn’t tested it; I don’t have the required here (at home with the flu) but it’s a good starting point. Put the files in a folder called KyloBlade and open KyloBlade.ino.

KyloBlade.h (2.0 KB)
KyloBlade.ino (3.9 KB)
KyloBlade.cpp (11.7 KB)

Good morning Ivan,

So sorry to hear you’re feeling unwell…hope you feel better very soon!!

Many thanks indeed for your help and advice…I’m going to get everything wired up today, and draw up a final connection drawing and post it on the forum, just in case any other Artekit Propboard users want to have a go at building their own Kylo saber!!

Have a fab day!!

Very best wishes

Dave

Thank you. Pictures and videos are welcome as well! :slight_smile: